iOS
Set up push notifications for the YourGPT iOS Chatbot SDK using Apple Push Notification service (APNs).
This guide explains how to enable push notifications in your iOS app using the YourGPT SDK. When set up, your users will receive notifications for new messages from the YourGPT widget even when the app is in the background or closed.
Prerequisites
- An Apple Developer account with push notification entitlements
- Your YourGPT widget UID
- iOS 13.0 or higher
- A physical iOS device (push notifications do not work on the Simulator)
Step 1: Enable Push Notifications in Xcode
- Open your project in Xcode
- Select your app target → Signing & Capabilities
- Click + Capability and add Push Notifications
- Also add Background Modes and check Remote notifications
Step 2: Create an APNs Key
- Go to Apple Developer → Keys
- Click the + button to create a new key
- Enter a name (e.g., "YourGPT Push Key")
- Check Apple Push Notifications service (APNs)
- Click Continue → Register
- Download the
.p8key file and note the Key ID - Note your Team ID from Membership Details
Important
You can only download the .p8 file once. Keep it safe.
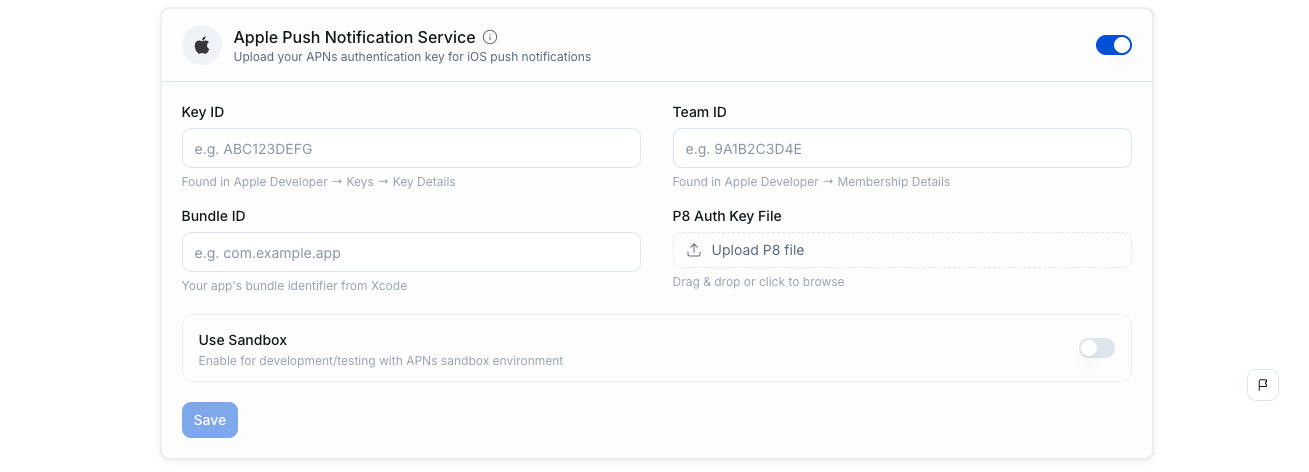
Step 3: Configure Push Notifications on YourGPT Dashboard
-
Log in to the YourGPT Dashboard
-
Navigate to your chatbot's Settings → Notifications
-
Enable the APNs toggle
-
Enter your Team ID and Key ID
-
Upload the
.p8key file you downloaded in Step 2 -
Enter your app's Bundle ID (e.g.,
com.yourcompany.yourapp) -
Click Save Credentials — the dashboard will verify the credentials automatically
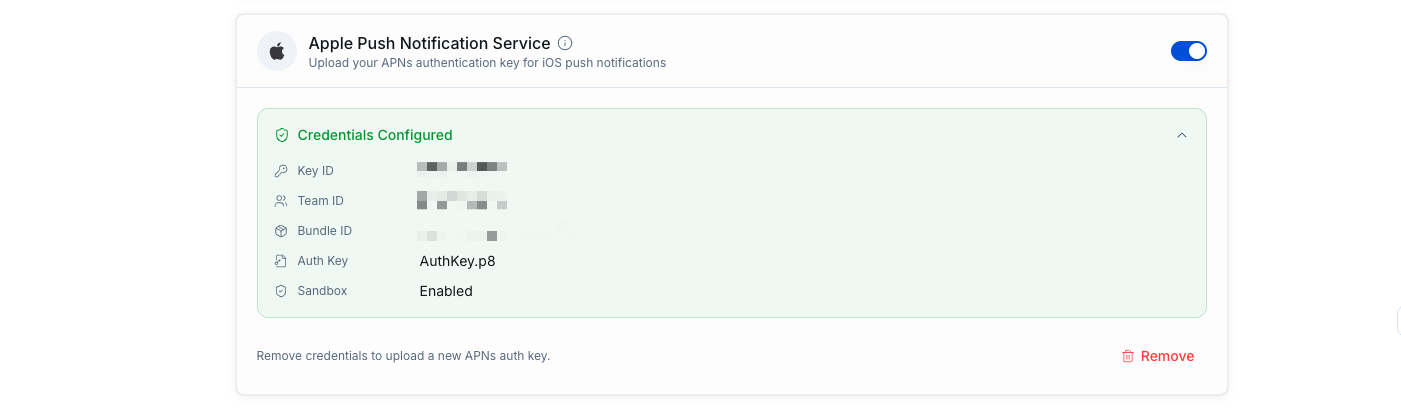
Once the status shows "Configured", your YourGPT backend is ready to send push notifications.
Flutter & React Native
If you are using the Flutter SDK or React Native SDK, you only need to complete Steps 1–3 above. The remaining steps on this page are specific to the native iOS SDK. Refer to your SDK's documentation for platform-specific notification setup.
Step 4: Set Up AppDelegate for APNs
Add the following to your AppDelegate.swift:
import UIKit
import YourGPTSDK

@main
class AppDelegate: UIResponder, UIApplicationDelegate, YourGPTNotificationHandler {

    func application(
        _ application: UIApplication,
        didFinishLaunchingWithOptions launchOptions: [UIApplication.LaunchOptionsKey: Any]?
    ) -> Bool {
        // Set up YourGPT notifications (installs delegate, requests permissions, registers for APNs)
        setupYourGPTNotifications(widgetUid: "YOUR_WIDGET_UID")
        return true
    }

    // MARK: - APNs Token

    func application(
        _ application: UIApplication,
        didRegisterForRemoteNotificationsWithDeviceToken deviceToken: Data
    ) {
        // Convert Data to hex string and cache for WebView JS bridge
        let token = deviceToken.map { String(format: "%02x", $0) }.joined()
        YourGPTNotificationClient.shared.cacheToken(token)
    }

    func application(
        _ application: UIApplication,
        didFailToRegisterForRemoteNotificationsWithError error: Error
    ) {
        print("Failed to register for APNs: \(error)")
    }
}
The YourGPTNotificationHandler protocol automatically:
- Installs a
UNUserNotificationCenterDelegatefor foreground display and tap handling - Requests notification permission from the user
- Registers with APNs
Step 5: Initialize the SDK with Notifications
There are two ways to initialize: Quick Setup (recommended) or Full Configuration.
Option A: Quick Setup (Recommended)
The simplest way — one line to enable everything:
import YourGPTSDK

class ViewController: UIViewController {
    override func viewDidLoad() {
        super.viewDidLoad()

        Task {
            try await YourGPTSDK.quickInitialize(widgetUid: "YOUR_WIDGET_UID")
        }
    }
}
This automatically:
- Initializes the SDK
- Enables minimalist notification handling
- Requests notification permission
- Registers notification categories
Option B: Full Configuration
For more control over notification behavior:
let notifConfig = YourGPTNotificationConfig(
    soundEnabled: true,
    soundName: "message_sound.wav",    // Place in app bundle
    badgeEnabled: true,
    groupMessages: true,
    autoDismissOnOpen: true
)

let config = YourGPTConfig(
    widgetUid: "YOUR_WIDGET_UID",
    enableNotifications: true,
    notificationMode: .minimalist,  // or .advanced
    notificationConfig: notifConfig
)

try await YourGPTSDK.initialize(config: config)
Step 6: Open the Widget at Least Once
The APNs token is registered with the YourGPT backend through the WebView JS bridge when the widget is opened. Until the widget is opened at least once, the backend won't know where to send notifications.
// Open the widget (e.g., on a button tap)
YourGPTSDK.show(from: self)
After the widget loads, the SDK automatically sends the cached APNs token to the backend. Subsequent token refreshes are also sent automatically the next time the widget is opened.
How It Works
Here's the full notification flow:
1. App starts → AppDelegate registers for APNs → Token received and cached
2. User opens widget → Token sent to YourGPT backend via WebView JS bridge
3. New message on backend → APNs push sent to device
4. YourGPTNotificationDelegate handles foreground/tap → Widget opens
Notification Modes
| Mode | Description | Use Case |
|---|---|---|
.minimalist | Auto-handles everything: display, tap actions, badge updates | Most apps — zero custom code needed |
.advanced | SDK identifies YourGPT notifications but does not display them; your app handles display | Apps that need custom notification UI |
.disabled | No notification handling | Apps that don't want push notifications |
Setting the Mode
// Via config during initialization
let config = YourGPTConfig(
    widgetUid: "YOUR_WIDGET_UID",
    enableNotifications: true,
    notificationMode: .minimalist  // or .advanced, .disabled
)

// Or change at runtime
YourGPTNotificationClient.shared.setNotificationMode(.advanced)
Available Configuration Options
| Option | Default | Description |
|---|---|---|
notificationsEnabled | true | Enable/disable notifications |
soundEnabled | true | Play sound on notification |
soundName | nil (system default) | Custom sound file name from app bundle |
badgeEnabled | true | Update app badge count |
groupMessages | true | Group notifications by conversation |
threadIdentifierPrefix | com.yourgpt.sdk | Prefix for notification thread identifiers |
autoDismissOnOpen | true | Remove notifications when widget opens |
quietHoursEnabled | false | Suppress notifications during hours |
quietHoursStart / quietHoursEnd | 22 / 8 | Quiet hours range (24h format) |
showMessagePreview | true | Show message content in notification |
maxPreviewLength | 100 | Max characters in notification preview |
showReplyAction | true | Show inline reply action |
stackNotifications | true | Stack notifications when multiple arrive |
maxNotificationStack | 5 | Max notifications before summarizing |
categoryIdentifier | chat_message | UNNotificationCategory identifier |
SDK Methods Reference
Notification Detection
// Check if a push payload is from YourGPT
let isYourGPT = YourGPTNotificationClient.shared.isYourGPTNotification(userInfo)

// Handle incoming notification (returns true if handled in minimalist mode)
let handled = YourGPTNotificationClient.shared.handleNotification(userInfo)
Widget
// Open the widget programmatically
YourGPTNotificationClient.shared.openWidget(from: viewController)

// Open to a specific conversation
YourGPTNotificationClient.shared.openWidget(from: viewController, sessionUid: "conversation-uid")

// Or use the SDK facade
YourGPTSDK.openSession(from: viewController, sessionUid: "conversation-uid")
State & Mode
// Check if notification client is initialized
let ready = YourGPTNotificationClient.shared.isInitialized

// Get current notification mode
let mode = YourGPTNotificationClient.shared.currentMode

// Get current notification config
let config = YourGPTNotificationClient.shared.currentNotificationConfig

// Change mode at runtime
YourGPTNotificationClient.shared.setNotificationMode(.advanced)
Notification Utilities
// Check if notifications are authorized
YourGPTNotificationHelper.areNotificationsEnabled { enabled in
    print("Notifications enabled: \(enabled)")
}

// Request notification permission
YourGPTNotificationHelper.requestPermission { granted, error in
    if granted {
        print("Permission granted")
    }
}
Advanced Mode: Custom Notification Handling
If you use .advanced mode, the SDK identifies YourGPT notifications but does not display them — your app handles display.
When to Use Advanced Mode
- Custom notification styling beyond the SDK defaults
- Different handling for different message types
- Integration with your own backend alongside YourGPT
- Custom actions or analytics on notifications
Complete Example
import UserNotifications
import YourGPTSDK

class CustomNotificationHandler: NSObject, UNUserNotificationCenterDelegate {

    func setupCustomHandling() {
        UNUserNotificationCenter.current().delegate = self

        // Initialize in advanced mode
        YourGPTNotificationClient.shared.initialize(
            widgetUid: "YOUR_WIDGET_UID",
            mode: .advanced
        )

        // Set callbacks for token and message events
        YourGPTNotificationClient.shared.setTokenCallback { token in
            print("New APNs token: \(token)")
            // Send to your own backend if needed
        }

        YourGPTNotificationClient.shared.setMessageCallback { userInfo in
            print("Push received: \(userInfo)")
            // Custom processing
        }
    }

    // Handle foreground notifications
    func userNotificationCenter(
        _ center: UNUserNotificationCenter,
        willPresent notification: UNNotification,
        withCompletionHandler completionHandler: @escaping (UNNotificationPresentationOptions) -> Void
    ) {
        let userInfo = notification.request.content.userInfo

        if YourGPTNotificationClient.shared.isYourGPTNotification(userInfo) {
            // Custom handling for YourGPT notifications
            // Show your own UI, log analytics, etc.
        }

        if #available(iOS 14.0, *) {
            completionHandler([.banner, .sound, .badge])
        } else {
            completionHandler([.alert, .sound, .badge])
        }
    }

    // Handle notification taps
    func userNotificationCenter(
        _ center: UNUserNotificationCenter,
        didReceive response: UNNotificationResponse,
        withCompletionHandler completionHandler: @escaping () -> Void
    ) {
        let userInfo = response.notification.request.content.userInfo

        if YourGPTNotificationClient.shared.isYourGPTNotification(userInfo) {
            // Navigate to the appropriate screen
            // Or let the SDK handle it:
            // YourGPTNotificationClient.shared.handleNotificationResponse(response, openWidgetFrom: rootVC)
        }

        completionHandler()
    }
}
Testing
- Use a physical iOS device (push notifications do not work on the Simulator)
- Grant notification permission when prompted
- Open the widget at least once (so the APNs token is registered with the backend)
- Close the app
- Send a test message through the YourGPT dashboard
Troubleshooting
Notifications not received
- Verify APNs credentials are uploaded and showing "Configured" on the YourGPT Dashboard (Settings → Push Notifications)
- Confirm the Push Notifications capability is enabled in your Xcode project
- Verify the Bundle ID matches what's configured on the dashboard
- Check that
didRegisterForRemoteNotificationsWithDeviceTokenis being called - Ensure the widget was opened at least once after SDK initialization (for token registration)
- Enable
debug: truein config and check console for[YourGPTNotificationClient]logs
Notifications received but not displayed
- Check that the app is in the background (foreground display requires
UNUserNotificationCenterDelegate) - Verify
notificationModeis not set to.disabled - Ensure quiet hours are not active
Widget doesn't open on notification tap
- Verify
YourGPTNotificationHandleris adopted by your AppDelegate - Ensure
setupYourGPTNotifications()is called indidFinishLaunchingWithOptions - Check that the handler's view controller is valid for presentation
Token not registered
- The APNs token is sent via the WebView JS bridge — the widget must be opened at least once
- Check console for
"APNs token sent to widget backend via JS bridge"message - If the token was refreshed while the widget was closed, it will be re-sent next time the widget opens