Pabbly
Automate YourGPT Chatbot actions with Pabbly Connect's no-code workflows.
💡 Connecting Your Chatbot with Pabbly
Pabbly Connect is a powerful workflow automation platform that allows you to connect YourGPT with hundreds of other applications without coding.
Before You Begin
Before starting the integration process, make sure you have:
- A YourGPT account: Sign up here
- A Pabbly Connect account (free or paid)
Integration Process
Connect to Pabbly
Log in to your Pabbly Connect account.
Search for YourGPT Chatbot in the Pabbly Connect app directory.
Select and connect your "YourGPT Chatbot" to Pabbly Connect.
Set Up API Authentication
Head over to YourGPT Dashboard.
Navigate to Integrations ⇒ API Integration ⇒ Generate API key.
Copy your API key for use in Pabbly Connect.
Note
For detailed instructions on generating API keys, visit the API Integration Guide
Create a Session
In your workflow, add a new action and select "YourGPT Chatbot".
Choose New Session as the action.
Provide the widget_uid in the action setup.
The widget_uid can be found in your YourGPT Chatbot Integrations.

Note
The New Session action initializes a conversation with your YourGPT chatbot and returns a session_uid that you'll need for sending messages.
Send a Message
Add another YourGPT Chatbot action to your workflow.
Select Send Message as the action.
Configure the following parameters:
widget_uid: The same ID used in the New Session actionmessage: The text content you want to sendsession_uid: Map this from the output of the New Session action
Test and Deploy
Test your workflow thoroughly to ensure all actions work correctly.
Once tested, you can activate your workflow for production use.
Consider adding error handling for robustness.
Use cases
Instantly reply to new lead ads
When someone fills out a Facebook or Instagram Lead Ad, let YourGPT send a personalized reply right away — instead of making them wait. It answers using what your chatbot has been trained on.
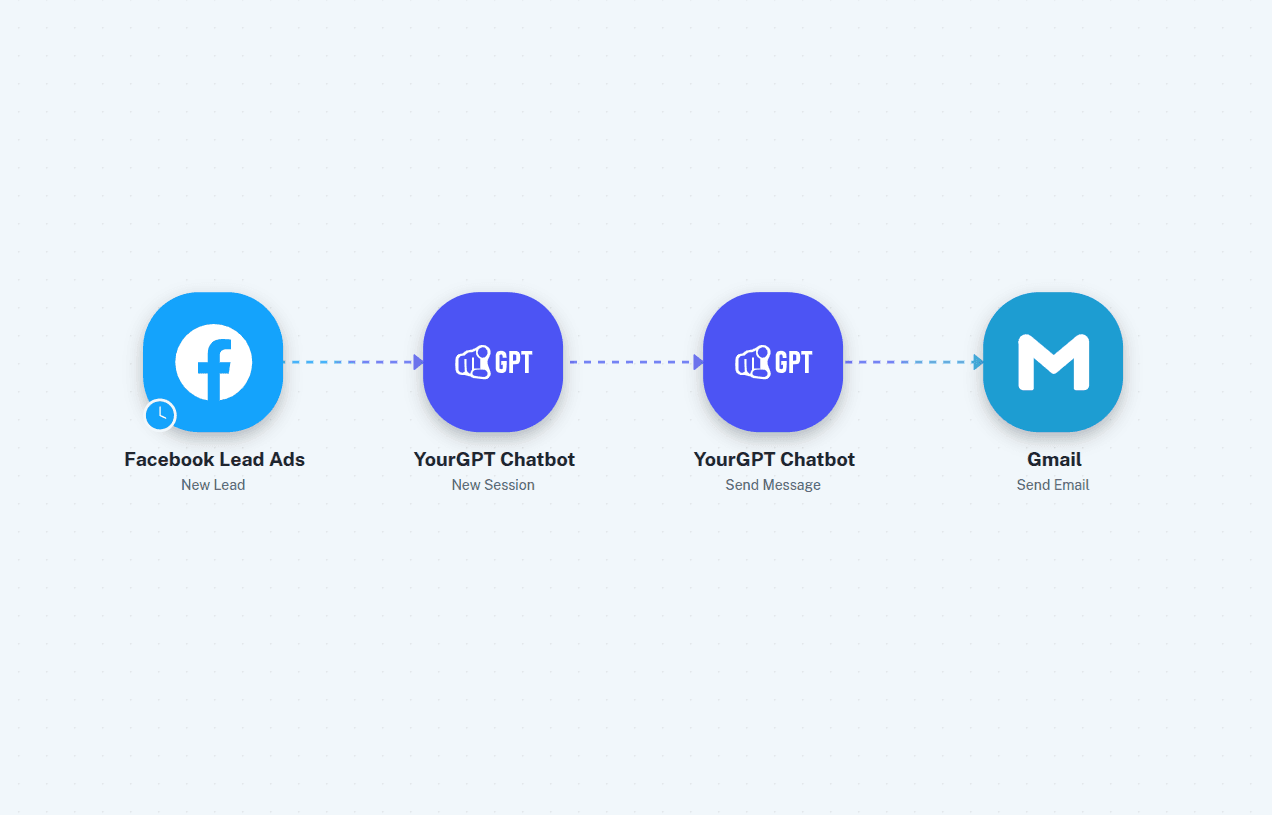
Catch the new lead
Start a workflow with Facebook Lead Ads (or Instagram Lead Ads) as the trigger, then connect your account and pick your lead form.
Start a chat session
Add the YourGPT Chatbot → New Session action and enter your Widget ID. This opens a conversation for the reply.
Let YourGPT answer
Add the YourGPT Chatbot → Send Message action. Pass the lead's question as the message and link the session from the previous step — YourGPT replies using your trained knowledge.
Email the reply
Add a Gmail → Send Email (or SMS) action to send YourGPT's answer to the new lead.
Capture and sync leads
Capture leads your chatbot collects — from the widget or a channel like Discord — and send them to Pabbly via a webhook to save in Google Sheets and notify your team. The video walks through the full setup.
Get a webhook URL
Create a workflow with Webhook by Pabbly → Catch Webhook as the trigger. Copy the webhook URL it generates.
Send leads from your chatbot
Enable Lead Generation in your chatbot settings and paste the Pabbly webhook URL. For custom fields (like industry or company size), send them instead from a Studio API Call node with method POST to the same URL.
Test the connection
Open your chatbot as a visitor and submit a lead. Confirm Pabbly captures the data.
Save and notify
Add actions to the workflow — for example Google Sheets → Add Row to save the lead, and Discord → Send Channel Message to alert your team.
By following these steps, you can integrate YourGPT AI chatbot with Pabbly Connect. For any questions, contact our team via Live support or Mail Us.